Welcome to Smile CDR
- Table of Contents 1.0
- Smile CDR Maturity Model 1.1
- Smile CDR Premium Solutions 1.2
- List of Features by Maturity 1.3
- Changelog (2024 Releases) 1.4
- Changelog (2023 Releases) 1.5
- Changelog (2022 Releases) 1.6
- Changelog (2021 Releases) 1.7
- Changelog (2020 Releases) 1.8
- Changelog (2019 Releases) 1.9
- Changelog (2018 Releases) 1.10
- Changelog (2017 Releases) 1.11
Getting Started
Installation
- Installing Smile CDR 3.0
- Docker Container Installation 3.1
- Unix Service Installation 3.2
- Tuning your Installation 3.3
- Message Brokers 3.4
- Message Broker Failure Management 3.5
- Message Broker: Kafka 3.6
- Message Broker: ActiveMQ 3.7
- Pre-Seeding Configuration and Data 3.8
- Upgrading Smile CDR 3.9
- Production Checklist 3.10
- Module Licensing 3.11
Tutorial and Tour
The FHIR Standard
- FHIR Introduction 5.0
- FHIR CRUD Operations 5.1
- FHIR Searching Basics 5.2
- FHIR Search: References and Includes 5.3
- FHIR Search: Custom Search Parameters 5.4
- FHIR Search: Combo Search Parameters 5.5
- FHIR Search: Enforcing Uniqueness 5.6
- FHIR Transactions and Batches 5.7
- FHIRPath Expressions 5.8
FHIR Storage
- Concepts in Smile CDR 6.0
- FHIR Storage Modules 6.1
- FHIR Endpoint Module 6.2
- FHIRWeb Console 6.3
- OpenAPI / Swagger Support 6.4
- FHIR Endpoint Customization 6.5
- Resource IDs 6.6
- Search Parameters 6.7
- Search Parameter Features 6.8
- Phonetic Search Parameters 6.9
- Search Parameter Tuning 6.10
- Search Parameter Reindexing 6.11
- Searching for Data 6.12
- Creating Data 6.13
- Reading Data 6.14
- Updating Data 6.15
- Deleting Data 6.16
- Binary Data 6.17
- Working with Duplicates 6.18
- Request Tracing and Provenance 6.19
- FHIR Versions 6.20
- Resource Versions and Versioned References 6.21
- Tags, Profiles, and Security Labels 6.22
- Partitioning and Multitenancy 6.23
- Custom Resource Types 6.24
- Batch and Scheduled Jobs 6.25
FHIR Storage (Relational)
- FHIR Storage (Relational) Module 7.0
- Resource Storage Mode 7.1
- Performance Tuning 7.2
- Full-Text Indexing 7.3
- Performance and Caching 7.4
- Chained Searching and Sorting 7.5
- MegaScale 7.6
- Meta Source Migration 7.7
- Database Partition Mode 7.8
FHIR Storage (MongoDB)
Validation and Conformance
- Introduction 9.0
- Validation Support Repository 9.1
- Validation Support Repository Options 9.2
- Conformance Data 9.3
- Repository Validation 9.4
- Repository Validation: Java 9.5
- Repository Validation: Javascript 9.6
- Repository Validation: Validation Bean 9.7
- Endpoint Validation 9.8
- Packages and Implementation Guides 9.9
- Package Registry Endpoint Module 9.10
- Remote Terminology Services 9.11
- Suppressing Messages 9.12
- Validation Performance 9.13
- Automatic Provenance Injection 9.14
Terminology
- Terminology Introduction 10.0
- Uploading Codes 10.1
- Terminology and Full-Text Indexing 10.2
- ValueSet Expansion 10.3
- FHIR Response Terminology Mapping 10.4
Subscription
- Introduction 11.0
- Architecture 11.1
- Channel Types 11.2
- Delivery Options 11.3
- Manual Triggering 11.4
- Topic Subscriptions 11.5
Interceptors
- Interceptors 12.0
- Pointcuts 12.1
- Starter Project 12.2
- Examples: FHIR Endpoints 12.3
- Examples: HL7v2 Endpoints 12.4
- Examples: FHIR Storage 12.5
- Examples: FHIR Gateway 12.6
- Examples: FHIR Client 12.7
- Examples: MDM 12.8
- Examples: Subscription 12.9
- Examples: Channel Import 12.10
- Examples: Cluster Manager 12.11
- Examples: Prior Auth CRD 12.12
- 2024.02.01 Migration Guide 12.13
Channel Import
Realtime Export
Security
- Security in Smile CDR 15.0
- Authentication Protocols 15.1
- Authorization and Consent 15.2
- Inbound Security Module 15.3
- Local Inbound Security Module 15.4
- LDAP Inbound Security Module 15.5
- Scripted Inbound Security Module 15.6
- SAML Inbound Security Module 15.7
- Trusted Client Mode 15.8
- Roles and Permissions 15.9
- Callback Scripts 15.10
- Anonymous Access 15.11
- Consent Service 15.12
- Consent Service: JavaScript API 15.13
- Consent Service: Java API 15.14
- Consent Module: Overview 15.15
- Consent Module: Examples 15.16
- Security Recipes 15.17
- Two Factor Authentication 15.18
- Troubleshooting Security 15.19
SMART on FHIR
- SMART on FHIR: Introduction 16.0
- SMART: Scopes 16.1
- SMART: Auth Flows 16.2
- SMART: Endpoints 16.3
- SMART: Smile CDR Support 16.4
- SMART Outbound Security: Module 16.5
- SMART Outbound Security: Skinning 16.6
- SMART Outbound Security: Context Selection 16.7
- SMART Outbound Security: SAML Bridging 16.8
- SMART: Federated OAuth2/OIDC Login 16.9
- SMART: Application Approval/Consent 16.10
- SMART Inbound Security Module 16.11
- SMART Client Definitions 16.12
- SMART Server Definitions 16.13
- SMART OIDC Keystore Definitions 16.14
- SMART: Session Management 16.15
- SMART: Assigning Permissions 16.16
- SMART: Access Tokens 16.17
- SMART: User Profile Information 16.18
- FHIR Client Authentication 16.19
appSphere
- Introduction 17.0
- Getting Started 17.1
- Associated Module Configurations 17.2
- Client Creation and Configuration 17.3
- Other Configurations 17.4
- Developer Portal 17.5
- App Management Console 17.6
- App Gallery 17.7
- Appendix 17.8
FHIR Gateway
- FHIR Gateway Introduction 18.0
- Configuration: Initial Setup 18.1
- Configuration: Document 18.2
- Custom Operations 18.3
- Caching 18.4
- Pagination 18.5
FHIR Hybrid Providers
LiveBundle
- LiveBundle Overview 20.0
- LiveBundle API 20.1
- LiveBundle Rule Definition 20.2
- LiveBundle Keepers 20.3
CDS Hooks
Master Data Management
- MDM 22.0
- MDM Quickstart Guide 22.1
- MDM Rule Definition 22.2
- Using EIDs in MDM Rule Definition 22.3
- MDM Survivorship Rules 22.4
- Upgrading from the EMPI module 22.5
- MDM UI 22.6
- MDM Blocklist Definition 22.7
- MDM Evaluate Operation 22.8
- MDM Virtualized Endpoint 22.9
Quality Improvement
- Quality Improvement Overview 23.0
- Clinical Quality Language (CQL) 23.1
- Care Gaps 23.2
- Evaluating Measures 23.3
- Quality Payment Program (QPP) 23.4
- ActivityDefinitions 23.5
- PlanDefinitions 23.6
- Questionnaires 23.7
IG Support
EasyShare
- EasyShare SMART Health Links (SHL) 25.0
- EasyShare SHL Public module 25.1
- EasyShare SHL Admin module 25.2
Clustering
Logging
- Overview 27.0
- Audit Log 27.1
- Transaction Log 27.2
- System Logging 27.3
- Troubleshooting Logs 27.4
- Custom Logging 27.5
HL7 v2.x Support
- Introduction 28.0
- Inbound Messaging 28.1
- FHIR-Based Terminology Translation 28.2
- Outbound Messaging 28.3
- Outbound: Default Resource Conversion 28.4
- Outbound: Custom Resource Conversion 28.5
- Outbound: Verbatim Messaging 28.6
- Outbound: Transport 28.7
- Transactions 28.8
- Structure Definitions 28.9
- Segment Definitions 28.10
- Table Definitions 28.11
- Naming System Mapping 28.12
- Processing Results Feeds 28.13
- Protocol 28.14
CDA Exchange Module
- Introduction 29.0
- JavaScript Templates 29.1
- Rest API Operations 29.2
- Available Document and Section Types for CDA Export 29.3
- Available Document and Section Types for CDA Import 29.4
- JavaScript Hooks on CDA Import / Export 29.5
- Further Reading 29.6
CDA Exchange+ Module
- Introduction 30.0
- JavaScript Templates 30.1
- Rest API Operations 30.2
- Available Document and Section Types for CDA Export 30.3
- Available Document and Section Types for CDA Import 30.4
- JavaScript Hooks on CDA Import / Export 30.5
- FHIR-Based Terminology Translation 30.6
- CDA Section-level Narrative Generation 30.7
- Further Reading 30.8
System to System Data Exchange
- System to System Data Exchange Module 31.0
- Smile CDR Payer to Payer Quickstart Guide 31.1
- Custom Matching Script 31.2
Bulk Operations
Additional Features
Monitoring
Product Administration
JSON Admin Endpoints
- JSON Admin API 36.0
- Audit Log Endpoint 36.1
- Batch Job Endpoint 36.2
- Bulk Import Endpoint 36.3
- CDA Exchange Endpoint 36.4
- Metrics Endpoint 36.5
- Module Config Endpoint 36.6
- OpenID Connect Clients Endpoint 36.7
- OpenID Connect Keystores Endpoint 36.8
- OpenID Connect Servers Endpoint 36.9
- OpenID Connect Sessions Endpoint 36.10
- Runtime Status Endpoint 36.11
- System Config Endpoint 36.12
- Transaction Log Endpoint 36.13
- Troubleshooting Log Endpoint 36.14
- User Management Endpoint 36.15
HFQL: Direct SQL Access
- HFQL/SQL Overview 37.0
- SQL Syntax 37.1
- SQL Syntax: Select 37.2
- SQL Syntax: Where 37.3
- SQL Syntax: Limitations 37.4
- SQL Syntax: Examples 37.5
Product Configuration
Java Execution Environment
JavaScript Execution Environment
- Introduction 40.0
- Specifying JavaScript in Configuration File 40.1
- Remote Debugging 40.2
- ECMA Modules (import) 40.3
- Converter API 40.4
- Environment API 40.5
- Exceptions API 40.6
- OAuth2 Exceptions API 40.7
- FHIR REST API 40.8
- FHIR Model API 40.9
- HL7 v2.x Mapping API 40.10
- HTTP API 40.11
- LDAP API 40.12
- Log API 40.13
- Composition Resource API 40.14
- Composition Section API 40.15
- TransactionBuilder API 40.16
- Util API 40.17
- UUID API 40.18
- XML API 40.19
- Callback Models 40.20
Database Administration
- Database Design 41.0
- Database Connection Pool 41.1
- Setting Up PostgreSQL 41.2
- Troubleshooting PostgreSQL 41.3
- Setting Up MySQL 41.4
- Setting Up MariaDB 41.5
- Setting Up Oracle 41.6
- Setting Up SQL Server (MSSQL) 41.7
- AWS IAM Authentication 41.8
Localization
Smile CDR CLI (smileutil)
- Introduction 43.0
- Bulk Import 43.1
- Create FHIR Package 43.2
- Execute Script Function 43.3
- Export ConceptMap to CSV 43.4
- HL7 v2.x Analyze Flat File 43.5
- HL7 v2.x Transmit Flat File 43.6
- Import CSV to ConceptMap 43.7
- Map and Upload CSV Bulk Import File 43.8
- Migrate Database 43.9
- Clear Database Migration Lock 43.10
- Module Config Properties Export 43.11
- Reindex Terminology 43.12
- Synchronize FHIR Servers 43.13
- Upgrade H2 Database File 43.14
- Upload Bundle Files 43.15
- Upload CSV Bulk Import File 43.16
- Upload Sample Dataset 43.17
- Upload Terminology 43.18
- Generate Realtime Export Schema 43.19
- Validate FHIR Resources 43.20
Apache Camel Integration
Prior Auth CRD (Coverage Requirement Discovery)
Prior Auth DTR (Documentation Templates and Rules)
Prior Auth Support
Modules
- JSON Admin API 48.0
- Web Admin Console 48.1
- CDA Exchange 48.2
- Channel Import 48.3
- Cluster Manager 48.4
- CQL 48.5
- Audit Log Persistence 48.6
- Transaction Log Persistence 48.7
- Digital Quality Measures (DQM) 48.8
- Documentation Templates and Rules (DTR) 48.9
- Enterprise Master Patient Index 48.10
- CDS Hooks Endpoint 48.11
- FHIR Gateway Endpoint 48.12
- FHIR REST Endpoint (All Versions) 48.13
- FHIR REST Endpoint (DSTU2 - Deprecated) 48.14
- FHIR REST Endpoint (DSTU3 - Deprecated) 48.15
- FHIR REST Endpoint (R4 - Deprecated) 48.16
- FHIRWeb Console 48.17
- HL7 v2.x Listening Endpoint 48.18
- HL7 v2.x Listening Endpoint (Deprecated) 48.19
- HL7 v2.x Sending Endpoint 48.20
- Hybrid Providers Endpoint 48.21
- Package Registry Endpoint 48.22
- Subscription Websocket Endpoint 48.23
- ETL Importer 48.24
- MDM 48.25
- MDM UI 48.26
- Prior Auth CRD 48.27
- Prior Auth Support 48.28
- Narrative Generator 48.29
- FHIR Storage (DSTU2 RDBMS) 48.30
- FHIR Storage (R3 RDBMS) 48.31
- FHIR Storage (R4 RDBMS) 48.32
- FHIR Storage (R5 RDBMS) 48.33
- FHIR Storage (Mongo) 48.34
- Realtime Export 48.35
- LDAP Inbound Security 48.36
- Local Inbound Security 48.37
- SAML Inbound Security 48.38
- Scripted Inbound Security 48.39
- SMART Inbound Security 48.40
- SMART Outbound Security 48.41
- Subscription Matcher (All FHIR Versions) 48.42
- Subscription Matcher (DSTU2 - Deprecated) 48.43
- Subscription Matcher (DSTU3 - Deprecated) 48.44
- Subscription Matcher (R4 - Deprecated) 48.45
- appSphere 48.46
- Payer to Payer 48.47
- System to System Data Exchange 48.48
- Amazon HealthLake Outbound REST Connector 48.49
- License 48.50
- Camel 48.51
- Consent Module 48.52
Configuration Categories
- Web Admin Console Settings 49.0
- appSphere 49.1
- Payer Config 49.2
- Initial appSphere Seeding 49.3
- Authentication Callback Scripts 49.4
- Auth: General for APIs 49.5
- User Authentication 49.6
- Auth: HTTP Basic 49.7
- Auth: OpenID Connect 49.8
- Browser Syntax Highlighting 49.9
- Camel 49.10
- Capability Statement (metadata) 49.11
- Care Gaps 49.12
- CDA Export 49.13
- CDA Generation 49.14
- CDA Import 49.15
- CDA Interceptors 49.16
- CDA JavaScript Execution Scripts 49.17
- CDA Terminology 49.18
- CDS Hooks Definitions 49.19
- CDS Hooks On FHIR 49.20
- Channel Import 49.21
- Channel Retry 49.22
- Kafka 49.23
- Cluster Manager Maintenance 49.24
- Message Broker 49.25
- Cluster Level Security 49.26
- Consent 49.27
- CQL 49.28
- Credentials 49.29
- Cross-Origin Resource Sharing (CORS) 49.30
- Invoke Export 49.31
- Member Match 49.32
- Database 49.33
- Da Vinci Health Record Exchange 49.34
- EasyShare SMART Health Links 49.35
- Email Configuration 49.36
- MDM UI 49.37
- ETL Import: CSV Properties 49.38
- ETL Import: Source 49.39
- Measure Evaluation 49.40
- FHIR Binary Storage 49.41
- FHIR Bulk Operations 49.42
- Capability Statement 49.43
- FHIR Configuration 49.44
- Consent Service 49.45
- FHIR Endpoint Conversion 49.46
- FHIR Endpoint HFQL Support 49.47
- FHIR Endpoint Partitioning 49.48
- Resource Providers 49.49
- FHIR Endpoint Security 49.50
- Endpoint Terminology 49.51
- FHIR Gateway Cache 49.52
- FHIR Gateway Configuration 49.53
- FHIR Interceptors 49.54
- LiveBundle Service 49.55
- FHIR MDM Server 49.56
- FHIR Performance 49.57
- FHIR Performance Tracing 49.58
- FHIR Realtime Export 49.59
- Repository Validation 49.60
- FHIR Resource Types 49.61
- FHIR REST Endpoint 49.62
- FHIR Search 49.63
- Custom Resource Types 49.64
- IG Support 49.65
- MegaScale 49.66
- FHIR Storage Module Conditional Updates 49.67
- FHIR Storage Module Scheduled Tasks 49.68
- FHIR Validation Services 49.69
- FHIR Validation Services Remote Terminology Client TLS / SSL (Encryption) 49.70
- FHIR Storage Package Registry 49.71
- FHIR Storage Partitioning 49.72
- Versioned References 49.73
- FHIR Subscription Delivery 49.74
- FHIR Subscription Persistence 49.75
- Full-Text Indexing 49.76
- Amazon HealthLake REST Endpoint 49.77
- HL7 v2.x Mapper - Contained Resource 49.78
- HL7 v2.x Mapper - DG1 49.79
- HL7 v2.x Mapper - Forced Namespace Mode 49.80
- HL7 v2.x Mapper - General 49.81
- HL7 v2.x Mapper - Medications 49.82
- HL7 v2.x Mapper - OBR 49.83
- HL7 v2.x to FHIR Mapper - OBSERVATION Group 49.84
- HL7 v2.x Mapper - ORC 49.85
- HL7 v2.x to FHIR Mapper - ORDER_OBSERVATION Group 49.86
- HL7 v2.x Mapper - PID 49.87
- HL7 v2.x Mapper - PV1 49.88
- HL7 v2.x Mapper - TXA 49.89
- Listener Interceptors 49.90
- HL7 v2.x Listener Script 49.91
- HL7 v2.x Listening Endpoint 49.92
- HL7 v2.x MLLP Listener 49.93
- HL7 v2.x MLLP Sender 49.94
- FHIR to HL7 v2.x Mapper Script 49.95
- HL7 v2.x Outbound Mapping 49.96
- HTTP Access Log 49.97
- HTTP Listener 49.98
- HTTP Request Pool 49.99
- HTTP Security 49.100
- Hybrid Providers Definitions 49.101
- IG Support 49.102
- Initial User Seeding 49.103
- JavaScript Execution Environment 49.104
- JSON Web KeySet (JWKS) 49.105
- LDAP Authentication 49.106
- Smile CDR License 49.107
- MDM 49.108
- Migration 49.109
- Narrative Generator 49.110
- OpenID Connect Token Validation 49.111
- OpenID Connect (OIDC) 49.112
- Payer to Payer 49.113
- Prior Authorization Coverage Requirement Discovery 49.114
- Prior Authorization Documentation Templates and Requirements 49.115
- Prior Authorization Support 49.116
- Privacy Security Notice 49.117
- Product Portal 49.118
- Provenance Injection 49.119
- Quality Payment Program (QPP) 49.120
- Realtime Export 49.121
- Endpoint Validation: Request Validating 49.122
- Scheduler Configuration 49.123
- Search Parameter Seeding 49.124
- SAML Provider 49.125
- Security Inbound Script 49.126
- Inbound SMART on FHIR Authentication 49.127
- Inbound SMART on FHIR Endpoints 49.128
- OAuth2/OIDC Federation 49.129
- SMART Callback Script 49.130
- Cross-Organizational Data Access Profile 49.131
- SMART Login Skin 49.132
- SMART Login Terms of Service 49.133
- SMART Authorization 49.134
- SMART Definitions Seeding 49.135
- Sessions 49.136
- Two Factor Authentication 49.137
- TLS / SSL (Encryption) 49.138
- Transaction Log 49.139
- Trusted Client 49.140
- User Self Registration 49.141
Module Dependencies
Product Reference
Amazon HealthLake Outbound REST Connector
Appendix
Preamble and Setup
4.0.1Smile CDR Tutorial and Tour of Features
This tutorial gives an overview of some of the features of Smile CDR, and it shows you how to manage and configure it for a few basic tasks.
4.0.2Getting Up to Speed
There are three general scenarios to be considered when following this tutorial. While most of what follows is applicable to all three, there will be sections that differ between scenarios or don't apply at all. Take a moment to identify which scenario applies to you, and follow along accordingly.
Public Test Server – Catch this bus if you'll be making use of Smile CDR's Public Test Server's FHIR endpoint at https://try.smilecdr.com:8000/baseR4.
Self-Hosted Instance – Cycle at your own pace if you'll be working with a Self-Hosted Instance of Smile CDR. By default, your FHIR endpoint's base URL will be http://localhost:8000/.
Cloud-Hosted Demo Instance – Ride in style if you've been set up with a Cloud-Hosted Demo Instance of Smile CDR. Use the base URL that you were provided, which should look something like https://example.smiledigitalhealth.com:8000/. Your demo instance of Smile CDR is pre-seeded with the test data and configuration required to complete this tutorial. If you have any questions about the setup or would like your configuration reset, please let us know!
4.0.3Preparing Your Instance
– The rest of this page is only relevant for self-hosted instances. Feel free to keep reading or skip ahead!
– Complete this page before before moving on to the next section.
If you haven't already, the first thing to do is to start Smile CDR. From the root directory of your installation, do the following:
$ bin/smilecdr start
(...starting messages...)
Smile, we are up and running!
4.0.4Accessing the Web Admin Console
The next thing is to sign into the Web Admin Console. This console can be used by administrators to configure almost all aspects of the system. Access the console using the following URL:
http://localhost:9100
To log into the console, enter your admin credentials. In a fresh self-hosted instance the username will be admin, and the password will be password. You should change these credentials before using Smile CDR in production with real data.
4.0.5Enabling Anonymous Access to the FHIR Endpoint
For security and by default, the server will reject anonymous access to the FHIR endpoint. For the purposes of this tutorial, we will enable it.
In the console, click on Config User Manager. This will take you to a screen that looks something like the following:
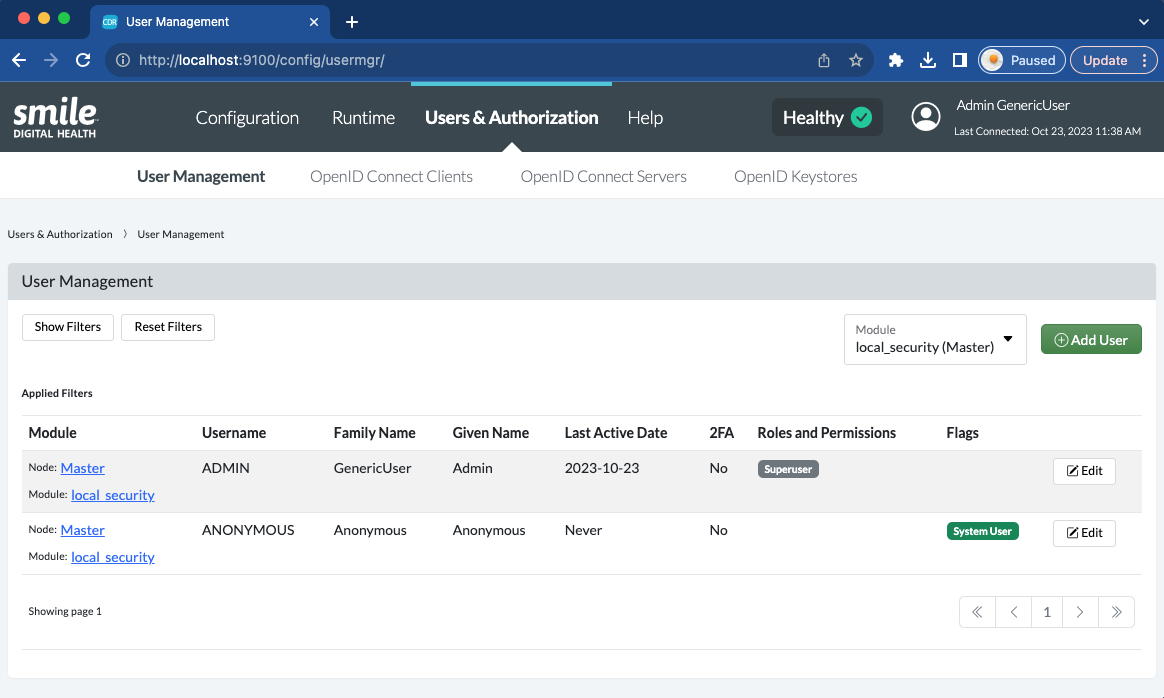
Note the user named ANONYMOUS. This is the user whose permissions are assessed when an anonymous request is made to the server. If this user does not have the FHIR Client (Superuser) permission as shown in the screenshot above, do the following:
- Click on
Modifyto edit theANONYMOUSuser. - Enable the role called
ROLE_FHIR_CLIENT_SUPERUSER. This role grants the anonymous user the necessary permissions to perform any standard FHIR client operation. - Click
Saveat the top and wait a moment for the change to propagate.
4.0.6Uploading Sample FHIR Resources
Next we will upload a set of example resources to the server. We will be uploading a collection of generated synthetic data that is realistic enough for the purposes of this tutorial.
Note: Depending on your system, this may take about 20 minutes.
From the root directory of your installation, do the following:
$ bin/smileutil upload-sample-dataset -e http://localhost:8000/
(...uploading...)
INFO  Upload complete