24.14.1Security Recipes
This page provides examples of how to configure Smile CDR for specific security designs.
24.14.2App: Local Users with HTTP Basic Authentication
This example illustrates how to set up a simple application. In this example, we're using Smile CDR's database for both resource storage as well as user storage and authentication. We will set up two users:
- A Regular User – with read-only access to data for a single patient
- An App Admin – with access to create and maintain data on the server
The following diagram illustrates this setup.

24.14.2.1Setting Up Modules
- Create Security Module
If your configuration does not already have one, first you should create a Local Inbound Security module. Configure this module with appropriate password encoding settings for your needs.
- Create FHIR Storage
Create a FHIR Storage (Relational) module for the version of FHIR you are looking to support.
- Create FHIR Endpoint
Create a FHIR Listener module for the version of FHIR you are looking to support.
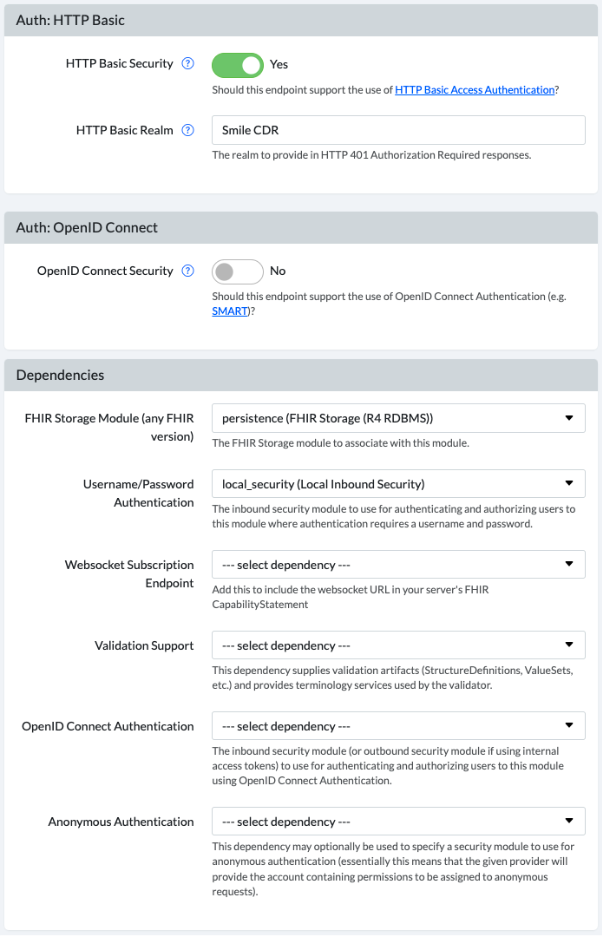
The FHIR REST endpoint should be configured with HTTP Basic security enabled, and the Username/Password Authentication dependency pointed to your Inbound Security module. This is shown in the screenshot below.
24.14.2.2Defining Permissions: App Admin
We will define permissions for an administrative user, who is allowed to perform any function on the repository. This user can create, update, and delete resources as required.
To set this up, grant the user the following permissions:
| Permission | Argument | Explanation |
|---|---|---|
ROLE_FHIR_CLIENT |
(n/a) | Allow user to be a FHIR client. |
ROLE_FHIR_CLIENT_SUPERUSER |
(n/a) | Allow user to perform any FHIR tasks. |
24.14.2.3Defining Permissions: Regular User
We will then define permissions for a user who is authorized to be a FHIR Client, and who can read any resource of types ValueSet and CodeSystem. Aside from that, the user can only read resources within a specific Patient compartment. This means that the user can access general administrative data (ValueSet and CodeSystem do not not typically contain sensitive data).
The user is blocked from reading other data that isn't in a specific Patient compartment to which they have access. The Patient compartment belongs to a specific Patient resource (e.g. Patient/123), and the only resources that can be read are limited to that specific patient instance as well as other resources with an explicit reference to that resource from one of the reference types defined by FHIR's Patient compartment (e.g. "Observations with the given patient as the subject" and "MedicationRequests with the given patient as the subject").
To set this up, grant the user the following permissions:
| Permission | Argument | Explanation |
|---|---|---|
ROLE_FHIR_CLIENT |
(n/a) | Allow user to be a FHIR client. |
FHIR_READ_ALL_OF_TYPE |
ValueSet |
Allow user to read any ValueSet resources. |
FHIR_READ_ALL_OF_TYPE |
CodeSystem |
Allow user to read any CodeSystem resources. |
FHIR_READ_ALL_IN_COMPARTMENT |
Patient/123 |
Allow user to read any Patient, Observation, QuestionnaireResponse, DiagnosticOrder, etc. that belong to the patient Patient/123. |
24.14.2.4Calling the API
Now that you have a FHIR Endpoint that has been secured using HTTP Basic Authentication, you will need to add an Authorization header to your requests.
Here is an example request showing the Authorization header:
GET /Patient/123
Accept: application/fhir+json
Authorization: Basic [credentials]
The [credentials] part above is a base64 encoded string in the format username:password. For example, the username admin and password password you would result in the following header:
Authorization: Basic YWRtaW46cGFzc3dvcmQ=
The base64 command can be used to base64 encode the credentials. For example:
echo -n "admin:password" | base64
YWRtaW46cGFzc3dvcmQ=
24.14.3Integrating SMART Apps With a 3rd-Party OIDC Server
In this example we are authorizing data requests to Smile CDR using a 3rd-party Identifity Provider, or more specifically a 3rd-party OpenID Connect server. This might be a software package such as MitreID Connect or Keycloak, or it could be a cloud service such as Okta or Ping Identity.
The proposed architecture here is shown below:

24.14.3.1Background And Terminology
To keep things simple, we'll refer to 3 roles in the example that follows (see SMART on FHIR Participants for more details on these roles):
- The Auth Server is the 3rd party Identity Provider. It stores information about the user account and makes assertions about who they are and what they can do.
- The Resource Server is the Smile CDR FHIR Endpoint with OpenID Connect security enabled.
- The App is a standard SMART on FHIR compliant application.
The OpenID Connect protocol relies heavily on cryptographically signed assertions about the user that are included in the token(s) which are passed from system to system. A simple way of thinking about these assertions is follows:
- The Auth Server creates a small JSON document with elements that states "The App that I gave this document to is logged in as John Smith, which corresponds to the FHIR Resource
Patient/A123. John has granted the app permission to perform read operations but not write operations." - The Auth Server uses a key to digitally sign the document. This same key is also distributed to the Resource Server so that it can verify the signature (this form of verification is known as "Shared Secret" verification and is an alternative to other forms such as RSA public/private keypairs which are also often used). This means that anyone who holds this token can digitally verify that the token was actually created by the Auth Server and that it was not modified.
- The Auth Server gives this signed document (which is in fact a JSON Web Token to the App. This signed document is now called a token. The app needs to keep the token secure since it was issued specifically for that app.
- The App includes the token in FHIR requests that it makes to the Resource Server.
- The Resource Server uses the public key from the Auth Server to verify that the token is genuine and has not been tampered with and uses the data contained within it to decide what operations should be allowed by the user.
24.14.3.2Scopes and Claims
The token, which is a signed JWT, contains a number of specific "claims", which are actually just fields within the JSON document. These fields identify the system that issued the token, metadata about the token and the session, and often details about the user.
A very simple example of a JWT follows:
{
    "sub":"myusername",
    "azp":"my-client-id",
    "scope":"openid profile patient\/*.read",
    "iss":"http:\/\/localhost:19202",
}
When this JWT is signed for sharing, it is also base64 encoded, resulting in a string resembling the following (although the real string is generally much longer):
yJhbGciOiJSUzI1NiJ9.eyJzdWIiOiJteXVzZXJuYW1lIi.9w3r9fy8czoy8YYUy
The OIDC protocol specifies that apps may request scopes, which are a mechanism for declaring specific permissions that the App has (in other words, they declare that the App has the ability to do specific things on the user's behalf). The SMART on FHIR specification declares a set of healthcare specific scopes, such as patient/*.read (app may read but not write any resource data about the current patient). These scopes are placed in a claim called "scope".
While scopes are used to convey App permissions, the OIDC protocol does mandate any specific mechanism for conveying User permissions. In our example here we will use additional custom claims that are used to convey the linkage between the user and the FHIR resource they are allowed to access.
24.14.3.3User Permissions
Conveying the details of what the user can do is probably the least intuitive part of this flow. This is mostly because the OIDC and SMART on FHIR specs aim to cover the authorizing of Apps, but leave the authorizing of Users up to the individual implementation.
In our example, we are going to add a single custom claim to the generated token called "patient" containing the resource ID that corresponds to the logged in user. In other words, the Auth Server will include a custom claim such as "patient": "A123" and this will be interpreted by the Resource Server as an assertion by the Auth Server that the logged in user is allowed to access any data belonging to the FHIR resource Patient/A123. This might include the Patient resource itself, but also Observations, Encounters, etc. that refer to the given patient.
This type of authorization is simplistic and can be expanded upon in many ways, but it serves to demonstrate the concept of authorizing patient-facing apps to allow patient users to access their own data without granting access to other users' data.
24.14.3.4Step 1: Configure The Auth Server
For our example, the Auth Server is configured with the following settings. The mechanism for achieving these settings will vary from provider to provider but the general concepts should exist in every provider.
Key
In our example here, we will use the following HS256 shared secret key. There is no requirement to use this form of signature, and you should absolutely generate your own key for any real scenarios but this key will work for testing. The format below is known as a JSON Web Key (JWK), and the value of the "k" attribute is the actual key contents.
{
  "kty": "oct",
  "use": "sig",
  "kid": "my-app-key",
  "k": "cdl6q83k7VNc-LtSzi_VzR3BvnTWmFGuQPuscZ45IOtVIb178ZwWwc65M1yhd-3Mmp_kxoe8_r_s5TN3pLOHYHynkAgavmJJHG-YDc6ksVD1cAQMXlL90BXfFuL0ewDCqgghkTd-qCGavGbi4rwqFOQp5QxbfT1-SK9q7-IgGOANVKiPIAS-bup1f0QwPUU3k9hNP5gF9dWHk4nK9KBZkO_iGXjrc1tv5gCGi1kKk9R4BAK0bHvDfQjR1ryl_Jkt_qdodd9cuyFr_lS6Rd7VsmnnEYEpwbleYtkcjqBJRvR86Ka6BQgzdSyBp3Lel2mL23X6gAw1TVT_jERPBmqBpg",
  "alg": "HS256"
}
Issuer
Any OpenID Connect server needs an Issuer URL. This URL serves two purposes: First, it is used as a unique identifier to actually indicate to the Resource Server which Auth Server actually issued the token. Second, it can be used as an actual resolvable URL by the App or Resource Server to introspect the token, meaning to invoke service endpoints on the Auth Server to query for more information about the token or the server.
In our example, we will use the issuer URL of: https://identity.example.com:9200
Client Definition
We will need to create a definition for the client (i.e. the App) in the identity server. This definition should include the following details:
-
The App should be approved to request the scopes
openidandprofile(these are standard OIDC scopes) as well aspatient/*.read(a SMART on FHIR scope that is automatically understood by Smile CDR) -
The Auth Server should also include the
"patient"claim in tokens it generates. You might start by simply manually hard coding this claim, and then refining this once the rest of the flow is working.
24.14.3.5Step 2: Create an Authentication Script
The following is an example of an Authenticaton Script.
In this script, we examine the "patient" claim, and if it exists we will grant the user full read/write permissions for any data in the given patient's "compartment" (compartments are a FHIR concept indicating resources that are deemed to "belong" to the given Patient). We will use scopes to indicate whether a given app should be allowed to read and/or write, so despite giving the user full permissions here, these rights will be reduced when a token is processed based on the approved scopes.
function onAuthenticateSuccess(theOutcome, theOutcomeFactory, theContext) {

   // Just log a bit about the user logging in.
   var username = theOutcome.username;
   var remoteAddress = theContext.remoteAddress;
   Log.info('User ' + username + ' is logging in from ' + remoteAddress);

   // Authorize access based on the "patient" claim.
   var patient = theContext.getClaim("patient");
   Log.info("Have access to patient: " + patient);
   theOutcome.addAuthority('FHIR_READ_ALL_IN_COMPARTMENT', 'Patient/' + patient);
   theOutcome.addAuthority('FHIR_WRITE_ALL_IN_COMPARTMENT', 'Patient/' + patient);

   return theOutcome;
}
24.14.3.6Step 3: Create a SMART Inbound Security module
If you do not already have one created, you should now create a SMART Inbound Security module in your Smile CDR module configuration. Give this module an ID, and then paste the script from step 2 into the Authentication Callback Script (Text) box. No other settings are required.
24.14.3.7Step 4: Configure the FHIR Endpoint module
In your FHIR Endpoint module you will want to:
- Enable OpenID Connect Security
- Set a module dependency on your new SMART Inbound Security module
- Restart the module
24.14.3.8Step 5: Create an OIDC Server Definition
Under Config OpenID Connect Servers you should create a server definition. This definition corresponds to your Auth Server.
Grant the server an Issuer ID of https://identity.example.com:9200 and paste the JWK (the full JSON document) from step 1 above into the text box labelled Key (Text) and then hit save.
No other settings are required.
24.14.3.9Testing This Setup
If you are able to, you can now request a real token from your Auth Server. For the purposes of demonstration, we'll go through an example that should also work with the given configuration.
The following JSON document is a JWT claim set containing the required claims for the setup described here:
{
    "iss": "https://identity.example.com:9200",
    "iat": 1573065974,
    "exp": 1604688374,
    "aud": "https://fhir.example.com:8000",
    "sub": "jsmith123",
    "scope": "openid profile patient/*.read",
    "family_name": "Smith",
    "given_name": "John",
    "patient": "A123"
}
When signed using the key above, this claim set results in the token below. Note that if you want to try modifying the claim set above and generating your own new token for testing you can do so using this tool. If you want to try parsing and verifying the signed token below, you can do so at JWT.io.
eyJ0eXAiOiJKV1QiLCJhbGciOiJIUzI1NiJ9.eyJpc3MiOiJodHRwczovL2lkZW50aXR5LmV4YW1wbGUuY29tOjkyMDAiLCJpYXQiOjE1NzMwNjU5NzQsImV4cCI6MTYwNDY4ODM3NCwiYXVkIjoiaHR0cHM6Ly9maGlyLmV4YW1wbGUuY29tOjgwMDAiLCJzdWIiOiJqc21pdGgxMjMiLCJzY29wZSI6Im9wZW5pZCBwcm9maWxlIHBhdGllbnQvKi5yZWFkIiwiZmFtaWx5X25hbWUiOiJTbWl0aCIsImdpdmVuX25hbWUiOiJKb2huIiwicGF0aWVudCI6IkExMjMifQ.un-o5De6VvmCUcuA8usKYzQmIGP95PTUYs78pxxm8gs
You may now invoke your FHIR endpoint using a request such as the following:
GET Patient/123
Authorization: Bearer eyJ0eXAiOiJKV1QiLCJhbGciOiJIUzI1NiJ9.eyJpc3MiOiJodHRwczovL2lkZW50aXR5LmV4YW1wbGUuY29tOjkyMDAiLCJpYXQiOjE1NzMwNjU5NzQsImV4cCI6MTYwNDY4ODM3NCwiYXVkIjoiaHR0cHM6Ly9maGlyLmV4YW1wbGUuY29tOjgwMDAiLCJzdWIiOiJqc21pdGgxMjMiLCJzY29wZSI6Im9wZW5pZCBwcm9maWxlIHBhdGllbnQvKi5yZWFkIiwiZmFtaWx5X25hbWUiOiJTbWl0aCIsImdpdmVuX25hbWUiOiJKb2huIiwicGF0aWVudCI6IkExMjMifQ.un-o5De6VvmCUcuA8usKYzQmIGP95PTUYs78pxxm8gs
Accept: application/fhir+json
24.14.3.10Extra Authorization Script Features
The following snippet shows the authorization script above with a few more examples of possible interactions.
Note that method getClaim() can be used on theContext object to get any claim in the JWT, of any data type.
Null will be returned, if no claim exists.
Alternatively, method getClaims() can be used to get all claims from the token as a Map object.
function onAuthenticateSuccess(theOutcome, theOutcomeFactory, theContext) {

   // Example of granting permissions based on specific claims. We'll
   // give users with the "ehr_admin" claim full superuser rights, and
   // we'll give users with the "ehr_user" claim access to all patient
   // data.
   if (theContext.getClaim("ehr_admin") === true) {
      theOutcome.addAuthority('FHIR_SUPERUSER');
   }
   if (theContext.getClaim("ehr_user") === true) {
      theOutcome.addAuthority('FHIR_READ_ALL_OF_TYPE', 'Patient');
   }

   // Example of adding permissions based on scopes
   if (theContext.getApprovedScopes().contains('view-claims')) {
       theOutcome.addAuthority('FHIR_READ_ALL_OF_TYPE', 'Claim');
   }

   // Authorize access based on the "patient" claim
   var patient = theContext.getClaims()["patient"];
   Log.info("Have access to patient: " + patient);
   theOutcome.addAuthority('FHIR_READ_ALL_IN_COMPARTMENT', 'Patient/' + patient);

   return theOutcome;
}