Docker Container Installation
This page provides additional details and guidance regarding installing Smile CDR in a Docker container. This section can be skipped if Smile CDR is being installed as a server application.
Quick Start
Note: As of the 2023.02.R01 Release, Smile CDR no longer runs as the root user inside the Docker container.
Therefore, the following Docker container instructions have been revised to assume that the user deploying Smile CDR inside the Docker container is also not the root user.
If you are running on a Linux-based system and you are NOT the root user, then you will need to prefix the operating system commands shown below with sudo, but you will NOT need to use the sudo prefix if you are the root user on your system.
Deploying from Releases Page
The following steps will result in a basic deployment of Smile CDR with out-of-the-box configuration in a Docker container.
Note These instructions will deploy Smile CDR from a Docker image created for AMD64 platforms. If you are deploying on a server or workstation that has ARM64 architecture, see the Deploying from Docker Repository section instead.
- Download the Smile CDR Docker Release that you wish to use from our Releases web site.
In the following scenario, we will be using the 2025.11.R06 version. Click on the Download Docker button shown in the screenshot:
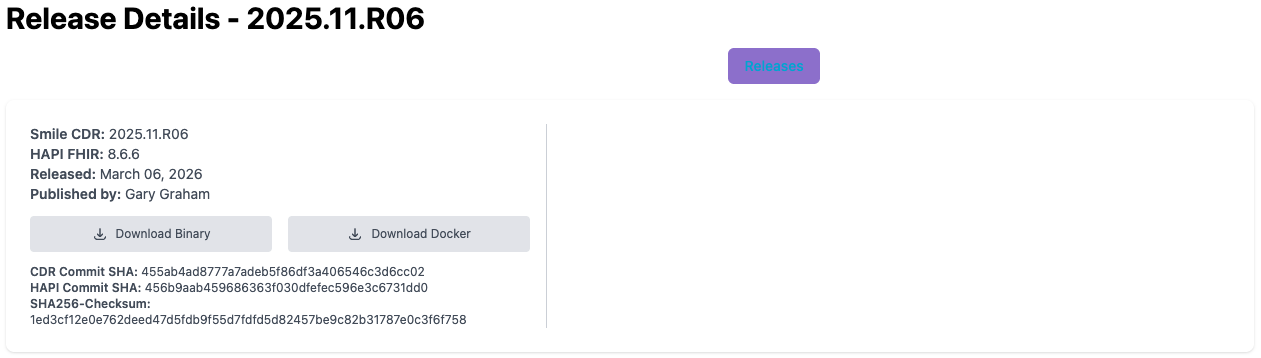
Note: You can contact your Customer Success representative to obtain your login information.
-
Create a working folder on your machine and save the downloaded Docker Image file called
smilecdr-2025.11.R06-docker.tar.gzinside that working folder. -
Create a file called
docker-compose.ymlin your working folder with the following contents:
version: "3.8"
services:
  smilecdr:
    container_name: smilecdr-2025.11.R06
    image: smilecdr:2025.11.R06
    platform: linux/amd64
    build:
      context: .
      dockerfile: Dockerfile
    ports:
      - "8000:8000"
      - "8001:8001"
      - "9000:9000"
      - "9100:9100"
      - "9200:9200"
      - "9201:9201"
    volumes:
      - db:/home/smile/smilecdr/database
      - log:/home/smile/smilecdr/log
      - mq:/home/smile/smilecdr/activemq-data
      - tmp:/home/smile/smilecdr/tmp
    restart: "unless-stopped"
volumes:
  db:
  log:
  mq:
  tmp:
Note: The platform: element in your docker-compose.yml file must be set to linux/amd64 if deploying a Smile CDR image downloaded from the Releases web site. Smile supports images for both linux/amd64 and linux/arm64 platforms, but the Releases web site only includes images for the linux/amd64 platform. For instructions on how to deploy a Smile CDR Docker container with a linux/arm64 platform image, see the Deploying from Docker Repository section.
- Create another file in your working folder called
Dockerfilewith the following contents:
FROM smilecdr:2025.11.R06

RUN mkdir /home/smile/smilecdr/activemq-data
RUN mkdir /home/smile/smilecdr/database
RUN mkdir /home/smile/smilecdr/log
RUN mkdir /home/smile/smilecdr/tmp
RUN chown -R smile:smile /home/smile/smilecdr/activemq-data
RUN chown -R smile:smile /home/smile/smilecdr/database
RUN chown -R smile:smile /home/smile/smilecdr/log
RUN chown -R smile:smile /home/smile/smilecdr/tmp
RUN chmod 775 /home/smile/smilecdr/activemq-data
RUN chmod 775 /home/smile/smilecdr/database
RUN chmod 775 /home/smile/smilecdr/log
RUN chmod 775 /home/smile/smilecdr/tmp
- Load the Smile CDR image into Docker
docker image load --input smilecdr-2025.11.R06-docker.tar.gz
Deploying from Docker Repository
Starting with the 2023.11.R01 Release release, Smile CDR Docker images supporting ARM64 platforms were added to the Smile CDR Docker repository. However the ARM64 compatible images are only available from the Smile CDR Docker repository and not in the Releases web site.
The following steps can be used to deploy either the pre-built ARM64 or AMD64 Smile CDR Docker image, which will result in a basic deployment of Smile CDR with out-of-the-box configuration in a Docker container.
- First login to the Smile CDR Docker repository using the same credentials used to access the Releases web site:
docker login https://docker.smilecdr.com -u [username]
Note: You can contact your Customer Success representative to obtain your login information.
- Use the
docker pullcommand to download the appropriate Smile CDR Docker image and platform version to your local repository. Note that thedocker pullcommand can infer the platform type to use, but the--platformoption can be used to override the default platform setting. In the following scenario, we will usedocker pullto retrieve the 2025.11.R06 version for ARM64 platform.
docker pull --platform linux/arm64 docker.smilecdr.com/smilecdr:2025.11.R06
If you instead need to download the AMD64 platform image, replace linux/arm64 in the above command with linux/amd64.
-
Create a working folder on your machine.
-
Create a file called
docker-compose.ymlin your working folder with the following contents:
services:
  smilecdr:
    container_name: smilecdr-2025.11.R06
    image: docker.smilecdr.com/smilecdr:2025.11.R06
    platform: linux/arm64
    build:
      context: .
      dockerfile: Dockerfile
    ports:
      - "8000:8000"
      - "8001:8001"
      - "9000:9000"
      - "9100:9100"
      - "9200:9200"
      - "9201:9201"
    volumes:
      - db:/home/smile/smilecdr/database
      - log:/home/smile/smilecdr/log
      - mq:/home/smile/smilecdr/activemq-data
      - tmp:/home/smile/smilecdr/tmp
    restart: "unless-stopped"
volumes:
  db:
  log:
  mq:
  tmp:
Set the platform: element in docker-compose.yml to match the platform of the image pulled from the Smile CDR Docker repository. Also make sure to prefix the image: name with docker.smilecdr.com/.
- Create another file in your working folder called
Dockerfilewith the following contents:
FROM docker.smilecdr.com/smilecdr:2025.11.R06

RUN mkdir /home/smile/smilecdr/activemq-data
RUN mkdir /home/smile/smilecdr/database
RUN mkdir /home/smile/smilecdr/log
RUN mkdir /home/smile/smilecdr/tmp
RUN chown -R smile:smile /home/smile/smilecdr/activemq-data
RUN chown -R smile:smile /home/smile/smilecdr/database
RUN chown -R smile:smile /home/smile/smilecdr/log
RUN chown -R smile:smile /home/smile/smilecdr/tmp
RUN chmod 775 /home/smile/smilecdr/activemq-data
RUN chmod 775 /home/smile/smilecdr/database
RUN chmod 775 /home/smile/smilecdr/log
RUN chmod 775 /home/smile/smilecdr/tmp
Make sure to prefix the image name in the FROM command with docker.smilecdr.com/.
Starting Smile CDR Docker container
- Start the Docker container
docker compose -f docker-compose.yml up -d --build
- Monitor the logs during the startup process
docker container logs -f smilecdr-2025.11.R06
Verifying Deployment
Assuming you see the phrase Smile, we're up and running! :) in the logs, you have now started the software. To exit the logs without stopping the container, simply type (ctrl-c).
With the software started, you can try a few things (replace localhost in the URLs below with the host name of your server if you are installing to a remote server):
- Log into the Web Admin Console at http://localhost:9100.
- This is the administration UI for configuring the system.
- Username:
admin(by default a single user with full privileges is created) - Password:
password
- Log into the FHIRWeb Console at http://localhost:8001.
- This is a FHIR testing tool which lets you explore the FHIR API.
- Make FHIR requests against the endpoint at http://localhost:8000
- This is an actual FHIR endpoint, so it is best to use a REST utility such as Postman to work with this endpoint. Note that by default the endpoint is secured with HTTP Basic auth, and will not accept anonymous requests.
- Explore the JSON Admin API at http://localhost:9000.
- This API may be used to configure the system via REST calls.
Troubleshooting Problems
If Smile CDR fails to start or does not appear to be responsive, here are a couple things that you can check:
- Check whether the container is running by executing the command
docker ps. If the container is running, you should see output similar to the following:
CONTAINER ID        IMAGE               COMMAND                  CREATED             STATUS              PORTS                                                                                                                NAMES
7e401352ab80        smilecdr            "/home/smile/smilecd…"   22 minutes ago      Up 17 minutes       0.0.0.0:8000-8001->8000-8001/tcp, 0.0.0.0:9000->9000/tcp, 0.0.0.0:9100->9100/tcp, 0.0.0.0:9200-9201->9200-9201/tcp   smilecdr
- You can start a shell session inside the running container using the following command:
docker exec -it smilecdr-2025.11.R06 /bin/bash
- Retrieve and/or examine the Smile CDR logs. There are a couple of options available for this:
- Use the command
docker container logs smilecdr-2025.11.R06to see recent console output. - Copy the log files from the container to a local folder as follows:
- Use the command
docker cp smilecdr-2025.11.R06:/home/smile/smilecdr/log/smile.log ./smile.log
Clean Up
When you are finished with this initial test, you can use the following command to stop and clean up the running container:
docker-compose -f docker-compose.yml down -v
Basic Configuration
To retrieve and review copies of the bin/ and classes/ folders deployed to the container when it is not running, you can use the docker cp command as follows:
docker cp smilecdr:/home/smile/smilecdr/bin /local/folder/bindocker cp smilecdr:/home/smile/smilecdr/classes /local/folder/classes
Before starting Smile CDR for the first time, there are two files you will want to examine for settings.
1. Environment Settings
In the bin/ directory you will find a file called setenv. This file may be used to change the amount of RAM available to Smile CDR, as well as number of other low level settings. It is a good idea to glance over it and ensure that the default settings make sense for your installation.
2. Application Configuration
In the classes/ directory you will find a file called cdr-config-Master.properties. This file contains all of the configuration for the modules which will be created the first time the system is started.
If changes are required to either of the configuration files above, these can be made by editing local copies of the configuration files and then copying the modified local files back to the container using the docker cp command:
docker cp ./bin/setenv smilecdr-2025.11.R06:/home/smile/smilecdr/bin
Customizing Smile CDR in Docker Container
If there is a need to change the configuration files or environment settings or to add jars to the customerlib/ directory in the Smile CDR container you can do this by creating a customized Smile CDR image based on the provided Smile CDR image and then re-creating the container using the command shown previously.
To create a customized Smile CDR image:
-
Setup Docker context
When building Docker images, you need to specify a single folder or context where Docker can find all of the build dependencies. Ensure that all of your configuration changes and additions are contained within a single folder, or create a new subfolder and copy all of your changes there.
-
Create a Dockerfile
Create a new Dockerfile that uses the original Smile CDR image as the base image and includes instructions for any additions or updates needed for the new image. For example:
# Use base Smile CDR image as parent image FROM smilecdr # Set the smilecdr folder as working directory WORKDIR /home/smile/smilecdr # Copy modified properties file to the container. copy ./my-config-Master.properties ./classes/cdr-config-Master.properties # Copy modified environment settings file to the container. copy ./setenv_modified ./bin/setenv # Add jar files to customerlib folder. copy ./sitelib.jar ./customerlib/sitelib.jar -
Build a new Docker image
Execute the
docker image buildcommand to build a new image, for example:docker image build -f Dockerfile .The
-foption above is used to specify the path and name of the Dockerfile. The last parameter (.) is the location of the Docker context folder which contains all of the changes and additions that are to be copied/added to the image. In the above example, it is specifying the current directory but it can point to any valid path on your local machine.
Mounting Customizations with Bind Mounts
Building a customized image as shown above bakes your changes into an image that must be rebuilt for every Smile CDR upgrade. As an alternative, the Smile CDR installation reserves a customer/ directory whose subdirectories hold nothing but a README.txt describing them, and exist only to receive bind mounts:
| Directory | Contents |
|---|---|
customer/classes | Loose files placed on the classpath: JavaScript callback scripts, narrative templates, and any other resource loaded through a classpath: path. |
customer/lib | JAR files placed on the classpath: interceptors, custom operation providers, Camel components, and their dependencies. |
The classpath is assembled at startup in the order classes/, lib/, customerlib/, customer/classes, customer/lib. A resource that exists under both classes/ and customer/classes is therefore loaded from classes/, and a class present in both customerlib/ and customer/lib is loaded from customerlib/; a bind mount adds files to the classpath but cannot replace one that Smile CDR ships. Because the customer/ directories are separate from the directories that ship with Smile CDR, mounting a host directory over customer/classes or customer/lib hides no file Smile CDR needs, and no file needs to be copied out of the container first.
The following docker-compose.yml mounts a host directory into each of them, mounts a node configuration file into customer/, and sets the CONFIGNAME environment variable to the path of that file:
services:
  smilecdr:
    container_name: smilecdr
    image: smilecdr
    ports:
      - "8000:8000"
      - "9000:9000"
      - "9100:9100"
    environment:
      CONFIGNAME: /home/smile/smilecdr/customer/cdr-config-node1.properties
    volumes:
      - ./customizations/classes:/home/smile/smilecdr/customer/classes:ro
      - ./customizations/lib:/home/smile/smilecdr/customer/lib:ro
      - ./my-config-node1.properties:/home/smile/smilecdr/customer/cdr-config-node1.properties:ro
The equivalent using docker run:
docker run -d --name smilecdr \
  -p 8000:8000 -p 9000:9000 -p 9100:9100 \
  -e "CONFIGNAME=/home/smile/smilecdr/customer/cdr-config-node1.properties" \
  -v "$(pwd)/customizations/classes:/home/smile/smilecdr/customer/classes:ro" \
  -v "$(pwd)/customizations/lib:/home/smile/smilecdr/customer/lib:ro" \
  -v "$(pwd)/my-config-node1.properties:/home/smile/smilecdr/customer/cdr-config-node1.properties:ro" \
  smilecdr
Because the CONFIGNAME value starts with /, Smile CDR reads it as a file path. The customer/ directory itself is not on the classpath, so the configuration file mounted there is found only through this path. See The Node Configuration Properties File for the other values CONFIGNAME accepts. Mounting the configuration file into customer/ also avoids mounting over classes/, which would hide the other files Smile CDR ships there.
Smile CDR reads the classpath once, at startup, so a container restart is required after adding or changing a JAR in customer/lib.
Using System Environment for Variable Substitution
Environment variables can be set inside the Smile CDR Docker container using the environment or env_file options in the docker-compose.yml file.
Configuration Properties
For example, if different environments use a different database password, you can alter the default Smile CDR configuration file inside the Docker container which includes a cdr-config-Master.properties file with the following parameters:
module.clustermgr.config.db.password = #{env['DB_PASSWORD_CLUSTERMGR']}
Then you can set a different password for each environment using a docker-compose.yml file for each environment, similar to the following:
services:
  smilecdr:
    container_name: smilecdr-2025.11.R06
    image: smilecdr:2025.11.R06
    build:
      context: .
      dockerfile: Dockerfile
    ports:
      - "8000:8000"
      - "9000:9000"
      - "9100:9100"
      - "8001:8001"
      - "9200:9200"
      - "9201:9201"
    environment:
      - DB_PASSWORD_CLUSTERMGR=password
    volumes:
      - db:/home/smile/smilecdr/database
      - log:/home/smile/smilecdr/log
      - mq:/home/smile/smilecdr/activemq-data
      - tmp:/home/smile/smilecdr/tmp
    restart: "unless-stopped"
volumes:
  db:
  log:
  mq:
  tmp:
Runtime Environment Settings
Alternatively, Docker container environment variables can be used to override default JVM and other environment settings normally determined by the setenv script. For example, the following command could be used to build and launch a Smile CDR Docker container with the JVMARGS setting determined by an external file (jvmargs.env in the example below):
version: "3.8"
services:
  smilecdr:
    container_name: smilecdr-2025.11.R06
    image: smilecdr:2025.11.R06
    build:
      context: .
      dockerfile: Dockerfile
    ports:
      - "8000:8000"
      - "9000:9000"
      - "9100:9100"
      - "8001:8001"
      - "9200:9200"
      - "9201:9201"
    env_file:
      - ./jvmargs.env
    volumes:
      - db:/home/smile/smilecdr/database
      - log:/home/smile/smilecdr/log
      - mq:/home/smile/smilecdr/activemq-data
      - tmp:/home/smile/smilecdr/tmp
    restart: "unless-stopped"
volumes:
  db:
  log:
  mq:
  tmp:
Read-Only Filesystem Support
Smile CDR supports running in a container with a read-only filesystem (for example, Kubernetes' readOnlyRootFilesystem: true or Docker's --read-only).
Read-only filesystem mode can be enabled with the cdr.read_only_filesystem.enabled=true system property, or the CDR_READ_ONLY_FILESYSTEM=true environment variable (which takes precedence); both default to false.
Out of the box, several Smile CDR components write into the installation directory, so read-only deployments require that each of these components is either configured to use an external service or be given a writable mounted volume.
Logging in a Read-Only Filesystem
When read-only filesystem mode is enabled, Smile CDR writes logs to stdout only, so the platform can aggregate them and no log files accumulate in the container's writable layer (see Stdout-Only Logging Configuration for the shipped configuration). Otherwise (the default), logs are written to files under the log/ directory.
Logging is customized only by supplying a modified customerlib/logback-smile-custom.xml file. If logs also need to be written to files, add file appenders in logback-smile-custom.xml and mount a writable volume at the log/ directory. See Custom Logging for the file's format and examples. Common ways to supply the file:
- Docker: bind-mount it read-only, or include it in a customized image (see Customizing Smile CDR in Docker Container). For example:
-v ./logback-smile-custom.xml:/home/smile/smilecdr/customerlib/logback-smile-custom.xml:ro
- Kubernetes: mount it from a ConfigMap over
customerlib/logback-smile-custom.xml(see ConfigMap Definitions).
Configuring Smile CDR with a Read-Only Filesystem
Routing logs to stdout is not enough to enable read-only filesystem support for Smile CDR. By default, several modules persist data into the installation directory (e.g., database/, activemq-data/). Before deploying with a read-only filesystem, review your configuration and, for each installation-directory writer, either replace it with an externalized, service-backed equivalent or give it a writable volume.
The settings that require attention, with solutions on how to adapt them to a read-only filesystem:
-
Embedded message broker:
module.clustermgr.config.messagebroker.type(defaultEMBEDDED_ACTIVEMQ). The embedded ActiveMQ broker persists its queues toactivemq-data/<node-id>-brokerin the installation directory. Switch to an external broker —REMOTE_ACTIVEMQ,KAFKA, orPULSAR. -
Embedded database:
module.<module>.config.db.driver(defaultH2_EMBEDDED). Embedded H2 writes its database files underdatabase/and is not recommended for production use. Switch to one of the external database drivers:POSTGRES_9_4,MSSQL_2012,ORACLE_12C. -
Disk-based fulltext index:
module.persistence.config.db.hibernate_search.mode(defaultLUCENE_DISK). The Lucene index is written to disk (by defaultdatabase/lucene_fhir_persistence). Switch toELASTICSEARCH, an external backend suitable for production, orLUCENE_MEMORY, which keeps the index in the JVM heap and writes nothing to disk (suitable for ephemeral or small deployments). -
Filesystem binary storage:
module.persistence.config.binary_storage.modeset toFILESYSTEM. Binary blobs are written to the directory configured bymodule.persistence.config.binary_storage.filesystem.directory. Keep the defaultDATABASE(orDATABASE_BLOB) storage, or use External Object Storage:AWS_S3,MINIO, orAZURE_BLOB_STORAGE.
This list covers the features that write to the installation directory out of the box; it is not exhaustive. Any interceptor, custom module, or feature you configure to write files under the installation directory (for example a file-based ETL/import staging directory, or a custom log/appender) will likewise fail on a read-only filesystem and must be pointed at a writable volume or an external service.
Stdout-Only Logging Configuration
The configuration below is the stdout-only logging config that ships in the official Docker image since 2026.11 and activates when read-only filesystem mode is enabled.
<configuration scan="true" scanPeriod="30 seconds">
	<appender name="STDOUT_SYNC" class="ch.qos.logback.core.ConsoleAppender">
		<filter class="ca.cdr.api.log.CdrPHISafetyLogFilter"/>
		<encoder>
			<pattern>%d{HH:mm:ss.SSS} [%thread] %highlight(%-5level) M:%X{moduleId} R:%X{requestId} T:%X{trace_id} S:%X{span_id} J:%X{instanceId} C:%X{chunkId} %logger{36} - %msg%n${log.stackfilter.pattern}</pattern>
		</encoder>
	</appender>
	<appender name="STDOUT" class="ch.qos.logback.classic.AsyncAppender">
		<includeCallerData>false</includeCallerData>
		<appender-ref ref="STDOUT_SYNC" />
	</appender>

	<root level="INFO">
		<appender-ref ref="STDOUT" />
	</root>

	<!-- Required for runtime troubleshooting logging. -->
	<appender name="TROUBLESHOOTING_APPENDER" class="ch.qos.logback.core.helpers.NOPAppender"/>
	<logger name="ca.cdr.log"><appender-ref ref="TROUBLESHOOTING_APPENDER"/></logger>
	<logger name="ca.uhn.fhir.log"><appender-ref ref="TROUBLESHOOTING_APPENDER"/></logger>

	<!-- Keep DLQ payloads and PHI out of stdout. -->
	<logger name="ca.cdr.DLQ-FAILURES" level="OFF"/>
	<logger name="ca.cdr.api.log.CdrPHISafetyLogFilter.REDACTED" level="OFF"/>

	<!-- hook for customer configuration from customerlib -->
	<include file="customerlib/logback-smile-custom.xml" optional="true" />
</configuration>
Configuring Databases for Smile CDR Installed in Container
When configuring a database that requires a URL with a hostname such as PostgreSQL, the hostname "localhost" will not be recognized by Smile CDR implementations running in a Docker container. Instead, you will need to specify one of the following:
- If deploying on a Windows or OSX server, use
host.docker.internalin place of "localhost". - If deploying on a Linux server, use the actual IP address of the server hosting the database. Note that for this to work, you will need to first ensure that the database is configured to listen for connections on the server's IP address. For example, in PostgreSQL it may be necessary to add an entry for the IP address in the pg_hba.conf configuration file.
An alternative approach is to install both Smile CDR and the database in a Docker stack. See this page for an example of how this could be done.