6.5.1Configuring Smile CDR
With the software started, you can try a few things (replace localhost in the URLs below with the host name of your server if you are installing to a remote server):
- Log into the Web Admin Console at http://localhost:9100.
- This is the administration UI for configuring the system.
- Username:
admin(by default a single user with full privileges is created) - Password:
password
- Log into the FHIRWeb Console at http://localhost:8001.
- This is a FHIR testing tool which lets you explore the FHIR API.
- Make FHIR requests against the endpoint at http://localhost:8000
- This is an actual FHIR endpoint, so it is best to use a REST utility such as Postman to work with this endpoint. Note that by default the endpoint is secured with HTTP Basic auth, and will not accept anonymous requests.
- Explore the JSON Admin API at http://localhost:9000.
- This API may be used to configure the system via REST calls.
6.5.1.1Clean Up
When you are finished with this initial test, you can delete the tempoarary database files and logs by removing the following directories:
[install root]/h2_database[install root]/log
6.5.2The Initial Configuration
Before proceeding with the setup of the system, let's look at the default configuration.
The following diagram shows the modules in a default installation of Smile CDR. Of course, the first thing you will probably want to do is reconfigure/add/change/remove these modules. For now, let's look at what comes out-of-the-box.
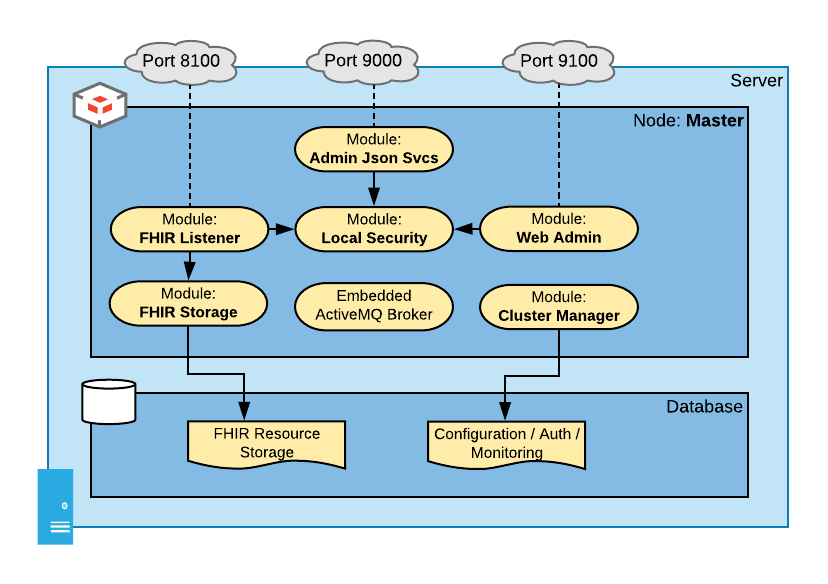
This diagram shows the following modules in a one-node cluster. Note that the addresses below (e.g. http://localhost:9100/) are placeholders. If you have installed Smile CDR on a server other than your own workstation the hostname will not be localhost, and the port numbers given are simply the initial default configuration (you may change any of them as you see fit by using Smile CDR's Web Admin Console).
- Web Admin Console (HTTP Port 9100): This module is the web-based administration UI that is used to control and configure Smile CDR. You can access this console at http://localhost:9100/. Note that by default you will have an admin user named
adminwith a password ofpassword. - Cluster Manager: This module supplies configuration to the rest of the system and persists it in a database. By default this configuration is stored in an H2 Database on the local filesystem. Note that this is not a production strength database. It's great for getting the system up and running so you can try it out – but you will need to reconfigure the cluster manager to talk to a real database (e.g. PostgreSQL or Oracle) before doing anything serious with Smile CDR.
- FHIR Listener (HTTP port 8000): This module is the FHIR endpoint that listens for FHIR REST client requests and responds to them. You can try this out by pointing your browser at http://localhost:8000/_history. By default you will simply get a security exception when you do this – but we will configure this later.
- FHIR Storage (Relational): This module handles storing FHIR resources in a relational database.
- JSON Admin API (HTTP port 9000): This module is an HTTP server serving up non-FHIR REST services for administering Smile CDR. These services can be used to perform health checks, start and stop modules, etc. These services have a Swagger documentation set you can access at http://localhost:9000/
- Local Security: This module provides authentication for other modules (the FHIR Listener, the JSON Admin API, and the Web Admin Console). It does this by storing user accounts and salted password hashes in the Smile CDR database. In a more advanced configuration, different/separate security modules can be used for different parts of your configuration. Again, this is simply a good place to start.
6.5.3The Node Configuration Properties File
Every module has a set of configuration properties that can be set. For example, the FHIR Listener module is configured with a port and default encoding, whereas the Local Security module is configured with settings for case-sensitivity.
When Smile CDR starts up, it uses a configuration file named cdr-config-$CONFIGNAME.properties to configure itself, where $CONFIGNAME is the value of the CONFIGNAME environment variable set by the setenv script. By default the setenv script sets CONFIGNAME to Master and so by default the configuration file is called cdr-config-Master.properties and is located in the classes directory.
This file contains several key pieces of configuration. First, it contains a section which will look like this:
################################################################################
# Node Configuration
################################################################################
node.id=Master
node.config.locked=false
node.security.strict=false
6.5.4Node Configuration Properties
node.id– This property identifies the ID for the node to start. In the default file that is shipped with Smile CDR, this node is calledMaster. You might choose to rename this if you are building a multi-node cluster but for a single node the default name is fine. In a multi-node cluster, each node must have a different ID so it is important to change this to something more appropriate. Note that node IDs must consist only of the following characters: US ASCII letters, numbers, underscore (_) and dot (.).node.config.locked– If this property is set to true, then module configuration can not be changed once the server has started. All web admin console configuration will display as read-only, and any attempt to change module configuration using the json endpoint or web admin console will be denied. Note that loading configuration from a property file will also lock configuration in the web admin consolenode.propertysource.node.security.strict– If this property is set to true, then the server will not start if the admin user still has the default password, any anonymous user has superuser privileges or if any Smart Outbound Security module is using the example keystore. Furthermore FHIR Endpoint access will be denied to any user with both anonymous and superuser privileges.node.environment.type– This property can be set to one of the following values:DEV,QA,PERF,STAGING,PROD. If it is not set, it will default toDEV. This property is currently only used to display the environment type in square brackets after the Node ID in the Web Admin Console. It may be used for other purposes in the future.
Smile CDR reads from the cdr-config-Master.properties file during start up. It will always take cluster manager settings from this file.
When it connects to the cluster manager database:
- If the schema doesn't exist, Smile CDR will create all necessary tables and populate them based on the configuration found in
cdr-config-Master.properties. - If the schema already exists then Smile CDR (by default) will automatically upgrade the schema to the current version if necessary. This automatic upgrade functionality can be controlled by the Schema Update Mode property.
- The source of configuration of Smile CDR can be controlled via the Module Property Source.
6.5.4.1Additional Node Configuration
Several other node configuration properties may also be placed in this file.
node.server_port_offset– This property specifies an offset that will be applied to all opened server ports on this node. See Server Port Offset for more information.node.propertysource– This property specifies where to look for module configuration. See Module Property Source for more information.node.archive_unknown_modules– If this property is set to true andnode.propertysource = PROPERTIES, then any previously defined modules that are no longer defined in the properties file will be automatically archived. Note that restore points are not created inPROPERTIESmode, even when automatic archiving enabled. Default is false.
6.5.4.2Cluster Manager Configuration
In the configuration file, you will also see a section that looks like the following:
################################################################################
# Cluster Manager Configuration
################################################################################
module.clustermgr.config.db.driver                         =H2_EMBEDDED
module.clustermgr.config.db.url                            =jdbc:h2:file:./database/h2_clustermgr
module.clustermgr.config.db.hibernate.showsql              =false
module.clustermgr.config.db.username                       =SA
module.clustermgr.config.db.password                       =SA
This section contains the configuration properties for the cluster manager (which is given the module ID of clustermgr). The configuration for this module is read at startup, and provides the configuration for the database where the cluster manager will store settings. The default installation uses an embedded H2 Database. This should be changed before you use Smile CDR for anything beyond quick prototyping.
6.5.5Module Property Source
The property file may also contain definitions for modules other than the Cluster Manager. The default file that is shipped with Smile CDR contains definitions for all of the other modules listed above.
By default, these definitions are used to seed the system with a set of modules the first time it starts up. However, after the first time the CDR has been started, the configuration for these modules will be read from the configuration database instead of from this property file. In other words, if you want to modify the database configuration for the cluster manager, you must always do this in the property file. If you want to modify the configuration for any other modules after the CDR has been started for the first time then you will need to modify it in the Web Admin Console.
If you wish to override this behavior you can use the node.propertysource key in the property file to specify where to source module config. This property may have any of the following values:
-
DATABASE– (this is the default if this property is not specified) Load the cluster manager configuration from the property file. Load all other modules from the database, unless no other modules are specified in the database (typically meaning that this is the first startup). Example:node.propertysource=DATABASE -
PROPERTIES– Load module configuration from the property file even if modules have previously been loaded. In other words, give priority to the property file even if this is not the first time the application has started. Please note that in PROPERTIES mode, no config settings at all will be sourced from the ones stored in the database. Any config settings that are not specified in yourcdr-config-Master.propertiesfile will automatically use their default values. This configuration mode will also have the same effect as setting thenode.config.lockedproperty to true. Example:node.propertysource=PROPERTIES -
PROPERTIES_UNLOCKED– This mode is intended for troubleshooting only. In this mode, changes to module configuration are permitted while the application is running. Temporary configuration changes can be applied by making changes in the Web Admin Console or via the JSON Admin API, but all changes are reset to the values found in the property file when the Smile CDR process restarts. In the case of a clustered deployment, changes are reset when any Smile CDR process in the cluster restarts.- Any edits to a module will persist after a module restart.
- Any edits to a module will be reversed after a cdr restart.
- Any newly created modules will be stay running until cdr is restarted.
- After a cdr restart, the new module will still exist but be stopped.
6.5.6Maintaining Module Configuration
6.5.6.0.1Adding Node Configurations
- Nodes can only be added using the configuration files.
- A given configuration file and Smile CDR instance can only have one node definition.
- Multiple Smile CDR instances with different node configurations can share a single Cluster Manager database, but each node configuration must have a unique node ID.
- Each node configuration requires at minimum a Cluster Manager module named
clustermgr.
6.5.6.0.2Deleting Node Configurations
Nodes cannot be deleted once configured in a Cluster Manager database.
6.5.6.0.3Changing Node Configurations
Nodes can only be changed by changing the configuration file containing the node configuration and restarting Smile CDR.
6.5.6.0.4Adding Module Configurations
- Cluster Manager modules cannot be added to a node. There can be only one Cluster Manager module and it must be defined in the configuration file for the node.
- Other modules can be added using either the configuration file or Web Admin console, depending on how the
node.propertysourcehas been configured for the node. - When adding a new module, its module name (also called module ID) must be unique within the node definition.
6.5.6.0.5Deleting Module Configurations
Modules cannot be deleted, they can only be archived. Manually archiving a module can be done using the Web Admin console and only if changes here are enabled by the node.propertysource configuration setting.
Archiving modules may also be done with the module-config endpoint.
Archiving a module does not delete the module configuration. Instead, it marks the module in such a way that:
- It cannot be started.
- It will not be visible in the Web Admin console.
- It cannot be used as a dependency by any active module.
The module definition will continue to exist in the database after being archived and as such its ID cannot be re-used for other module definitions.
While in node.propertysource=PROPERTIES mode, the only way to archive modules is to enable node.archive_unknown_modules. While using this, removing all related configurations for a module from the cdr-config-NAME.properties file will automatically archive the module. Conversely, if an archived module with the same module id is added back into the .properties file, it will be reinstated. Note that restore points are not created with this method of archiving.
6.5.6.0.6Reinstating Module Configurations
Since modules are not deleted, previously archived modules can be reinstated. This can be done using the Web Admin console and only if the changes are enabled by the node.propertysource setting. Reinstating modules may also be done with the module-config endpoint.
While in node.propertysource=PROPERTIES mode, reinstating can be done by enabling node.archive_unknown_modules and reintroducing configuration with the same archived module id back to the properties file. Note that restore points are not created with this method of reinstating.
6.5.6.0.7Deprecated Module types
Occasionally module types will be deprecated. However, unless otherwise stated as part of the release notes, a deprecated module type will continue to be supported and as such will not necessarily need to be changed or replaced. In most cases, the only noticeable difference will be that the module type will no longer appear as an option in the Web Admin console drop-down when creating a new module instance.
In the rare instance where support is dropped completely for a previously deprecated module type, the upgrade notes will provide specific guidance on how to migrate away from this module type.
Note: As per the Upgrade Instructions support for the long deprecated SMART_APPS_HOST module type was dropped starting with the 2023.05.R01 release. If you have a module of this type configured in your deployment, contact Smile CDR support for more information on removing the definition for this module.
6.5.6.0.8Changing module configurations
- The configuration of the
clustermgrmodule can only be changed by changing the configuration file. - Other modules can be changed using either the configuration file or the Web Admin console depending on how the
node.propertysourcehas been configured for the node. - Neither the module type nor module ID of an existing module can be changed. If you have a requirement to change the type or ID of an existing module, it will be necessary to stop and archive the existing module and create a new module with the new type and a new distinct ID.
6.5.7Variable Substitution
Within the property file, it is possible to put placeholders that will be evaluated. This can be used for example to pass database passwords or other runtime properties in from the underlying system environment.
There are two strategies for passing in data from the system environment:
6.5.7.0.1Java System Property Substitution
System properties may be accessed from the configuration property file via the following syntax:
module.clustermgr.config.db.password=#{systemProperties['dbpassword']}
Using the bin/setenv File:
Within the bin/setenv file, you may add system properties using the format -Dname=value. For example, the following line adds a database password to the setenv file.
JVMARGS="$JVMARGS -Ddbpassword=somepassword"
Using External File Property Sources
Within the configuration properties file, you may add references to external properties files that will be loaded into the system properties.
This is done by adding an entry (or multiple entries) in the configuration file such as the following:
node.system_properties.source.0=classpath:externalprops.properties
This example uses a file called externalprops.properties found in the classes/ directory as an additional source of system properties.
Note:
- You may define multiple sources of external properties by adding a suffix of
.0,.1, etc., to the name of the entry in the configuration file. - The value prefixes of
classpath:(for files in theclasses/directory) andfile:(for files elsewhere in the filesystem).
6.5.7.0.2System Environment Variable Substitution
The underlying system environment variables are also available using the following syntax. Using this syntax means that you do not need to explicitly specify anything in the setenv file, and may be useful for some configurations (e.g. Docker Containers).
module.clustermgr.config.db.password=#{env['dbpassword']}
6.5.8Fetching Configuration Using Scripts
In some cases it can be useful to pull configuration values from external sources. For example, if a system such as CyberArk is being used to store database credentials, Smile CDR will need to request these credentials from CyberArk any time that it is starting relevant modules. This type of setup can be achieved using JavaScript functions that are executed when the property value is needed.
In order to define a script to fetch a property value, a file should be placed in [Smile CDR root]/classes called config-source-scripts.js. This file should have one or more functions with the following characteristics:
- The function should take no arguments
- The function should return a string value
- The function can use the JavaScript Execution Environment APIs except for the following:
In order to invoke the function, any property in Smile CDR configuration may take a value with the form {{javascript:functionName()}}.
For example, the following snippet shows a script that can be used to fetch a database credential:
function fetchPasswordFromRestService() {
	var get = Http.get('https://myauth.example.com/AIMWebService/api/Accounts?AppID=SmileCDR&Query=Safe=DB;Object=DB');
	get.execute();
	if (!get.isSuccess()) {
		throw get.getFailureMessage();
	}

	// In this example, the service returns a simple JSON document with an element
	// called "DatabaseCredential". We will use the value of that element as
	// the password to return
	var responseJson = get.parseResponseAsJson();
	var password = responseJson.DatabaseCredential;
	return password;
}
A corresponding entry in the Smile CDR configuration properties file is shown below:
module.clustermgr.config.db.password = {{javascript:fetchPasswordFromRestService()}}
6.5.9Configuring Your Database
A default installation of Smile CDR has two database configuration settings. The first is for the cluster manager database, and contains configuration settings, audit trails, performance information, etc. The second is for the storage module, which is where FHIR resources are stored.
These are defined separately for several reasons:
- Separation allows each database to have different characteristics.
- Separation also allows a single cluster to host multiple FHIR repositories
While it is possible for these two databases to share a single physical database schema and instance, it is strongly recommended that in production these be hosted in separate databases.
Before starting the CDR for the first time, you may want to adjust the clustermgr and persistence modules to use a database platform other than H2. H2 a lightweight embedded database intended for testing purposes only.
6.5.9.1PostgreSQL
The following example shows a postgres configuration:
################################################################################
# Cluster Manager Configuration
################################################################################
module.clustermgr.type                                      =CLUSTER_MGR
module.clustermgr.config.db.driver                          =POSTGRES_9_4
module.clustermgr.config.db.url                             =jdbc:postgresql://localhost/cdr
module.clustermgr.config.db.username                        =cdr
module.clustermgr.config.db.password                        =cdrpassword

################################################################################
# Database Configuration
################################################################################
module.persistence.type                                     =PERSISTENCE_R4
module.persistence.config.db.driver                         =POSTGRES_9_4
module.persistence.config.db.url                            =jdbc:postgresql://localhost/cdr
module.persistence.config.db.username                       =cdr
module.persistence.config.db.password                       =cdrpassword
6.5.9.2MongoDB
The following example shows a MongoDB configuration. Note that when using MongoDB, a Cluster Manager database is still required, and must use a relational database. The example below shows H2 database, which is acceptable for non-production uses but should not be used for production use cases (or any use cases where data loss is not acceptable).
################################################################################
# Cluster Manager Configuration
################################################################################
module.clustermgr.type                                     =CLUSTER_MGR
module.clustermgr.config.db.driver                         =H2_EMBEDDED
module.clustermgr.config.db.url                            =jdbc:h2:file:./database/h2_clustermgr
module.clustermgr.config.db.username                       =SA
module.clustermgr.config.db.password                       =SA

################################################################################
# Database Configuration
################################################################################
module.persistence.type                                     =PERSISTENCE_MONGODB
module.persistence.config.db.url                            =mongodb://localhost:27017/fhir
module.persistence.config.db.username                       =cdr
module.persistence.config.db.password                       =cdrpassword
6.5.9.3H2 Database
The following example shows an H2 configuration.
################################################################################
# Cluster Manager Configuration
################################################################################
module.clustermgr.type                                     =CLUSTER_MGR
module.clustermgr.config.db.driver                         =H2_EMBEDDED
module.clustermgr.config.db.url                            =jdbc:h2:file:./database/h2_clustermgr
module.clustermgr.config.db.username                       =SA
module.clustermgr.config.db.password                       =SA

################################################################################
# Database Configuration
################################################################################
module.persistence.type                                    =PERSISTENCE_R4
module.persistence.config.db.driver                        =H2_EMBEDDED
module.persistence.config.db.url                           =jdbc:h2:file:./database/h2_fhir_storage
module.persistence.config.db.username                      =SA
module.persistence.config.db.password                      =SA
6.5.10Starting the CDR
Once you have prepared your configuration
To start the server, simply execute the command smilecdr start as follows:
$ bin/smilecdr start
2016-11-27 22:13:06.394 INFO  Smile CDR 2017-05-R01 / master / build 1de9be72
2016-11-27 22:13:06.404 INFO  Starting Smile CDR with configuration[Master]
2016-11-27 22:13:07.420 INFO  Starting module clustermgr
2016-11-27 22:13:16.948 INFO  Starting module local_security
2016-11-27 22:13:19.658 INFO  Starting module admin_web
2016-11-27 22:13:22.984 INFO  Starting module persistence
2016-11-27 22:13:37.863 INFO  Starting module fhir_endpoint
2016-11-27 22:13:38.854 INFO  Starting module admin_json
2016-11-27 22:13:40.591 INFO  CDR has fully started in 34192ms
Assuming you see the phrase CDR has fully started, you have now started the software.
6.5.11API Gateways
API Gateways are a popular choice as a part of the software stack in organizations that have many APIs exposed to their users. API gateways will often provide any or all of the following features:
- Security (checking API keys and access tokens, making access control decisions)
- Monitoring
- Quality of Service checking (e.g. enforcing throttling on clients exceeding their quota)
An API gateway is not necessary when using Smile CDR, but it can certainly be useful and we recommend using one if one is already present for other APIs. As an example of an excellent architectural pattern, an API gateway can be placed in front of Smile CDR with security featured enabled. Smile CDR is then also security enabled (e.g. with Access Token passthrough enabled in the Gateway) meaning that there are two layers of security testing happening before data is accessed. This type of "defense in depth" strategy is very effective.
# Resource PathsMany Smile CDR configuration properties require a path to a file, such as a script or a data file to use for seeding data.
These properties are called Resource Paths.
The format for such a path is to use the form classpath:/path/to/file.ext. Paths are relative to the classes/ directory within the Smile CDR installation and can reference any files in this directory. They can also reference path to files found within JAR files in customerlib/ directory.
Alternately, the form file:/path/to/file.ext may be used in order to specify a local file path.